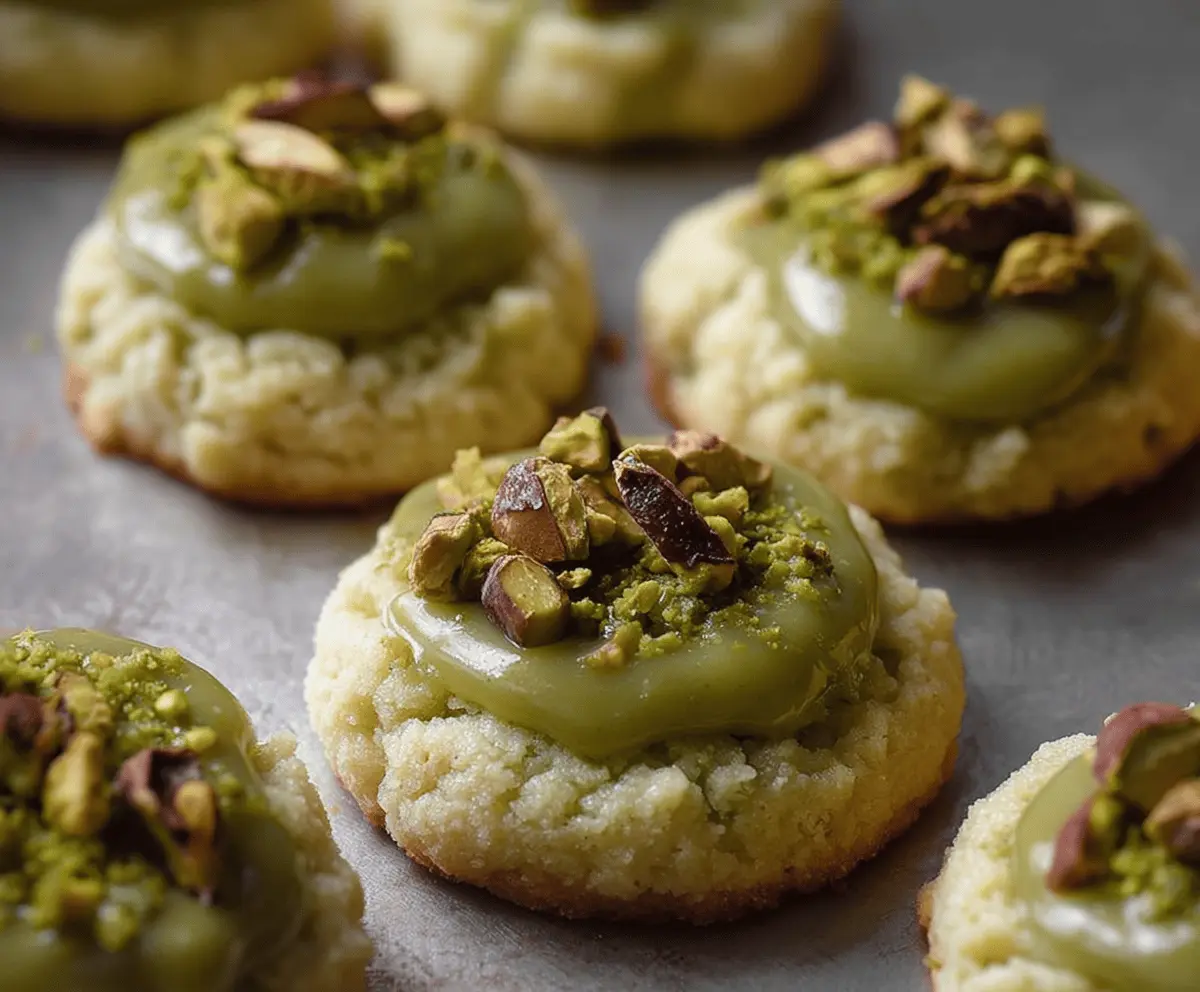
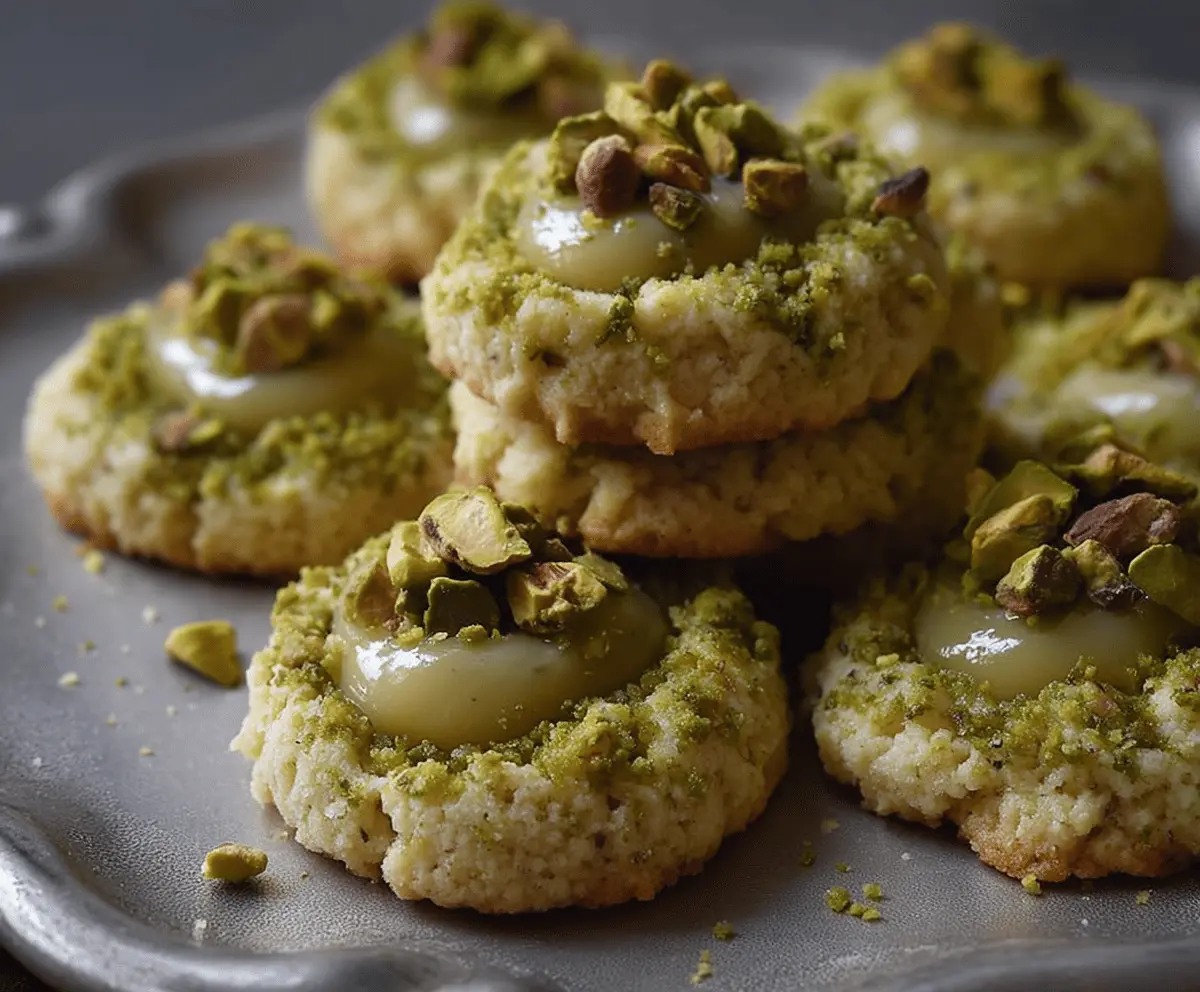
Get ready for these delightful Buttery Pistachio Thumbprint Cookies! They’re soft, buttery, and filled with a tasty jam. The pistachios add a nice crunch and vibrant color.
These cookies are perfect for any occasion, and they look so fancy, but they are super easy to make. I love how the jam peeks through the thumbprint—adorable and yummy! 🥳
Key Ingredients & Substitutions
Butter: Using unsalted butter is best to control the saltiness. If you’re looking for a dairy-free option, substitute with coconut oil or a plant-based butter. Just remember, it might alter the flavor a bit!
Pistachios: Each cookie has finely chopped pistachios mixed in for a great texture. If you’re nut-free, sunflower seeds or pumpkin seeds can work nicely. Just make sure they’re finely chopped too!
Jam: Lemon curd gives these cookies a zesty kick. If you prefer something sweeter, use strawberry, raspberry, or apricot jam instead. You can also make your own fruit spread using mashed fruit and a bit of sugar!
Flour: All-purpose flour is standard here, but for gluten-free cookies, you can try a 1:1 gluten-free baking blend. The cookies may be a bit different but still tasty!
How Do You Create the Perfect Thumbprint Indentation?
The thumbprint makes these cookies unique! To achieve a great indentation, follow these tips:
- Make sure the dough is slightly chilled before rolling into balls. It’s easier to handle that way!
- Use your thumb gently to press down the center of each cookie. If you find it sticking, you can lightly flour your thumb or use the back of a spoon.
- If the indentations puff up while baking, don’t worry! Just press them down lightly with a spoon again right after taking them out of the oven.
Keeping the indentations deep is key for holding the jam later. Your cookies will look adorable and taste delicious! Enjoy baking!
Buttery Pistachio Thumbprint Cookies
Ingredients You’ll Need:
For the Cookie Base:
- 1 cup (2 sticks) unsalted butter, softened
- 2/3 cup granulated sugar
- 1 large egg yolk
- 1 teaspoon vanilla extract
- 2 cups all-purpose flour
- 1/2 teaspoon salt
- 1/2 teaspoon baking powder
- 1 cup shelled pistachios, finely chopped (reserve some coarsely chopped for topping)
For the Filling:
- 1/3 cup lemon curd (or your choice of jam)
How Much Time Will You Need?
This recipe takes about 20 minutes to prepare, plus an additional 15 minutes to bake. Just add about 5 minutes for cooling after baking, and you’ll have delicious cookies ready in about 40 minutes!
Step-by-Step Instructions:
1. Prepping the Oven and Baking Sheet:
Start by preheating your oven to 350°F (175°C). While it heats up, line a baking sheet with parchment paper to prevent your cookies from sticking.
2. Creaming the Butter and Sugar:
In a large bowl, use a mixer to cream together the softened butter and granulated sugar. Mix until the mixture is light and fluffy, which usually takes about 2-3 minutes. This helps incorporate air into the dough for fluffy cookies!
3. Adding Egg Yolk and Vanilla:
Next, beat in the egg yolk and vanilla extract. Continue mixing until everything is well combined; you’ll love the sweet aroma!
4. Mixing the Dry Ingredients:
In a separate bowl, whisk together the all-purpose flour, salt, and baking powder. This ensures your cookies rise nicely and have a balanced flavor.
5. Combine Everything:
Gradually add the dry ingredients to the butter mixture. Mix just until combined to avoid overworking the dough. Remember, less is more!
6. Incorporating Pistachios:
Gently fold in the finely chopped pistachios, giving your cookies a lovely crunch and flavor.
7. Forming Cookie Balls:
Roll the dough into 1-inch balls and place them about 2 inches apart on the prepared baking sheet to give them room to spread.
8. Creating the Thumbprint:
Using your thumb (or the back of a spoon), gently press an indentation into the center of each dough ball. This will hold the delicious jam later!
9. Coating with Pistachios:
Roll the outer edges of each cookie in the remaining finely crushed pistachios for extra flavor and crunch. This step will give your cookies a pretty green border!
10. Baking Time:
Bake the cookies in the preheated oven for about 12-15 minutes. Keep an eye on them; they should be golden on the edges but still soft in the center!
11. Pressing Down After Baking:
As soon as the cookies come out of the oven, check the centers. If they puffed up, lightly press down in the center again. This will make sure they hold the jam perfectly!
12. Cooling the Cookies:
Let the cookies cool on the baking sheet for about 5 minutes before transferring them to a wire rack to cool completely.
13. Filling the Thumbprints:
Once the cookies are fully cooled, take about 1 teaspoon of lemon curd or your chosen jam and fill each thumbprint center. You can be generous with the filling!
14. Garnishing:
Top each filled thumbprint with a few coarsely chopped pistachios for an extra touch of flavor and a beautiful presentation.
15. Serving the Cookies:
Your Buttery Pistachio Thumbprint Cookies are now ready to enjoy! Whether for a party or a sweet treat at home, these cookies are sure to impress!
Happy baking, and enjoy every bite! 🍪💚
Can I Use Different Nuts in These Cookies?
Absolutely! While pistachios give these cookies a unique flavor, you can substitute them with other nuts like almonds, walnuts, or hazelnuts. Just make sure they’re finely chopped for even distribution in the dough!
How Do I Store Leftover Cookies?
Store any leftover cookies in an airtight container at room temperature for up to 5 days. If you want to keep them fresher for longer, you can freeze them. Just layer them between parchment paper in an airtight container, and they should last up to 3 months!
Can I Make the Dough Ahead of Time?
Yes, you can! Prepare the dough then wrap it tightly in plastic wrap and refrigerate it for up to 3 days. When you’re ready to bake, just let it sit at room temperature for about 10 minutes before rolling into balls and baking.
What Should I Do If My Dough is Too Sticky?
If your dough feels too sticky to handle, don’t worry! Just chill it in the refrigerator for about 30 minutes. This will firm it up and make it easier to roll into balls without sticking to your hands.